Sunday, August 29, 2010

Reading the Instructions

This week we actually started working through the Assembly Manual itself. Until now all we've done is preparatory work, so it was nice to attach some things to the car.

We started by removing all of the aluminum pieces that came on the car. We took lots of pictures so we can figure out how to put them back in later.

The first steps in assembly were to bend brake lines around some of the frame from the rear axle all the way to the front wheels. It took a few tries to get it right, but we eventually made pieces that fit and got them riveted in place on the chassis. We also ran some fuel lines under the passenger side of the car. Those really tall lines sticking up in the engine bay are in preparation for running fuel lines to the engine later.

We also received the valve covers we ordered, so we put those on. They look nice without being too shiny.

Speaking of shiny, as we conducted a full inventory last week of every nut and bolt we did take pictures of a few parts. Here are the guages for the dash, our seatbelts (a real racing harness!), and the fuel filler cap. The filler cap has a spring-loaded opening mechanism that was invented by endurance racers to speed up fuel stops. Ours has a real fuel cap hidden underneath, but the chrome cap replicates the original look.


This evening, we installed much of the front suspension. It was too dark for pictures, so you'll have to wait until next week!

Sunday, August 22, 2010

Big changes this week!

After finishing as much of the engine as we could (we are waiting on new valve covers to arrive) we turned our attention to cleaning the transmission. It was the last messy job we have until we get to the bodywork many months from now.

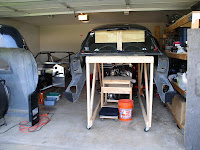
With all of the donor parts clean, it was time to build a buck to store the body. I had a plan, and we almost stuck to that plan. We reached our goal, though which was to safely store the body with enough support to prevent it sagging or warping in the hot sun while allowing us to use the space under the body to store parts, etc. Here is the result.

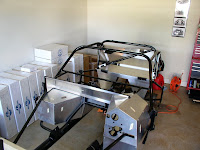
With the body off, we set about identifying, labelling and photographing the relationship between the 20 aluminum panels that were bolted to the chassis when it arrived. All of these panels have to be removed so we can run brake lines, fuel lines and a few other things. Eventually, all of these panels will be riveted back into place. We have a box of aditional aluminum panels to rivet on as well. The kit came with 1200 rivets for a reason, I guess.

Tuesday, August 17, 2010

ENGINE WORK


We labelled and removed just about everything from the donor engine. As you can see it started out pretty dirty.


We added a couple of upgrades to give it a little more power and are almost done putting it back together.

Monday, August 9, 2010

The crate is gone! I'm very pleased with the progress we are making, as the crate arrived in July.

We pulled apart the crate this week. We cleaned the rear suspension pieces, the pedals, the fuel tank, and lots of cables. We pulled the transmission and engine off of the pallet at the bottom of the crate and hauled it out of the garage.


We're ready to start cleaning the engine and transmission. I ordered some upgrade parts for the engine, so we'll install those as well.

Once the engine is ready, we will begin assembling the buck to store the body. The buck will ride over and around items like the engine, and will take some creative engineering. We can't really start on the kit itself until the body is off of the frame, so we'll be eager to finish the buck.

Sunday, August 1, 2010

The kit is here!!


Right on schedule, our Coupe (#497 from this manufacturer) arrived on July 29th. The truck drivers were very friendly and very careful. We have a pile of boxes to go with the parts that were temporarily attached to the car. Amazingly, we are expecting many more boxes as individual parts were back-ordered.

The back-order will not be a problem, as we still have a lot of work to do with what we did receive. We need to get back to cleaning up the donor parts. Then we need to build a body support (called a buck) to allow us to remove the body from the chassis. In order to store the body in the garage when we're not working on it, the buck will have to be tall enough to store the body above the pile of parts (seen below on the right) but low enough to clear the garage door opening.