Simmering with Rage
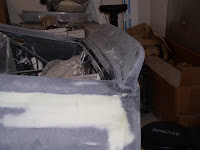
We've been working in the early morning and the late evening to avoid the worst of the heat, but I don't think this is slowing us down much. We're to the point where we are applying Rage, then waiting for it to cure before sanding it a bit and applying more. We'll mix 4-5 batches of Rage each time we work on the body, and we figure we're probably sanding almost half of that back off the next time.
Where the fender meets the door, we have a high spot on the door on the top of the fender, and a low spot on the door where it meets the side of the fender. We had to re-install the window frames as they affect where the door sits when it is closed.
Following some advice we found online, we're taping the high spot so we don't add Rage to that part while we build up the low spot. This takes several applications, as a single layer must be thin.


At the front of the doors, both the fender and the door taper inward. Once we bring up the low spots as shown below, we will fill across the door opening to give a nice smooth feel from the door to the fender. Following still more advice we found online, we used an adhesive weatherstrip between the door and fender to keep from filling that gap with Rage. We're not looking to permanently shut the doors!


The bottoms of the hood were pretty rough, so we put a thin coat to give a nice surface for the paint later. On the driver's door, you can see we are one coat further along than was pictured for the passenger door. It is a challenge to skim the Rage to level the door and fender. You have to work quickly to give a smooth finish, but you want to be thorough as well to minimize the number of coats it takes to do the job.


Another week or two of this, and we'll be ready to shoot SlickSand. This is a sprayable surfacer that looks like a primer coats but is actually designed to help us remove any remaining surface imperfections and to give a nice smooth look for the paint. We will need to build a couple of stands for each half of the body, as we will remove the body before spraying it.
Someone send some cooler weather our way, we could sure use it!
We've been working in the early morning and the late evening to avoid the worst of the heat, but I don't think this is slowing us down much. We're to the point where we are applying Rage, then waiting for it to cure before sanding it a bit and applying more. We'll mix 4-5 batches of Rage each time we work on the body, and we figure we're probably sanding almost half of that back off the next time.
Where the fender meets the door, we have a high spot on the door on the top of the fender, and a low spot on the door where it meets the side of the fender. We had to re-install the window frames as they affect where the door sits when it is closed.
Following some advice we found online, we're taping the high spot so we don't add Rage to that part while we build up the low spot. This takes several applications, as a single layer must be thin.


At the front of the doors, both the fender and the door taper inward. Once we bring up the low spots as shown below, we will fill across the door opening to give a nice smooth feel from the door to the fender. Following still more advice we found online, we used an adhesive weatherstrip between the door and fender to keep from filling that gap with Rage. We're not looking to permanently shut the doors!


The bottoms of the hood were pretty rough, so we put a thin coat to give a nice surface for the paint later. On the driver's door, you can see we are one coat further along than was pictured for the passenger door. It is a challenge to skim the Rage to level the door and fender. You have to work quickly to give a smooth finish, but you want to be thorough as well to minimize the number of coats it takes to do the job.


Another week or two of this, and we'll be ready to shoot SlickSand. This is a sprayable surfacer that looks like a primer coats but is actually designed to help us remove any remaining surface imperfections and to give a nice smooth look for the paint. We will need to build a couple of stands for each half of the body, as we will remove the body before spraying it.
Someone send some cooler weather our way, we could sure use it!


